
Written by Al Jory Marble Team
Published: September 16, 2026
Read Time: 17 minutes
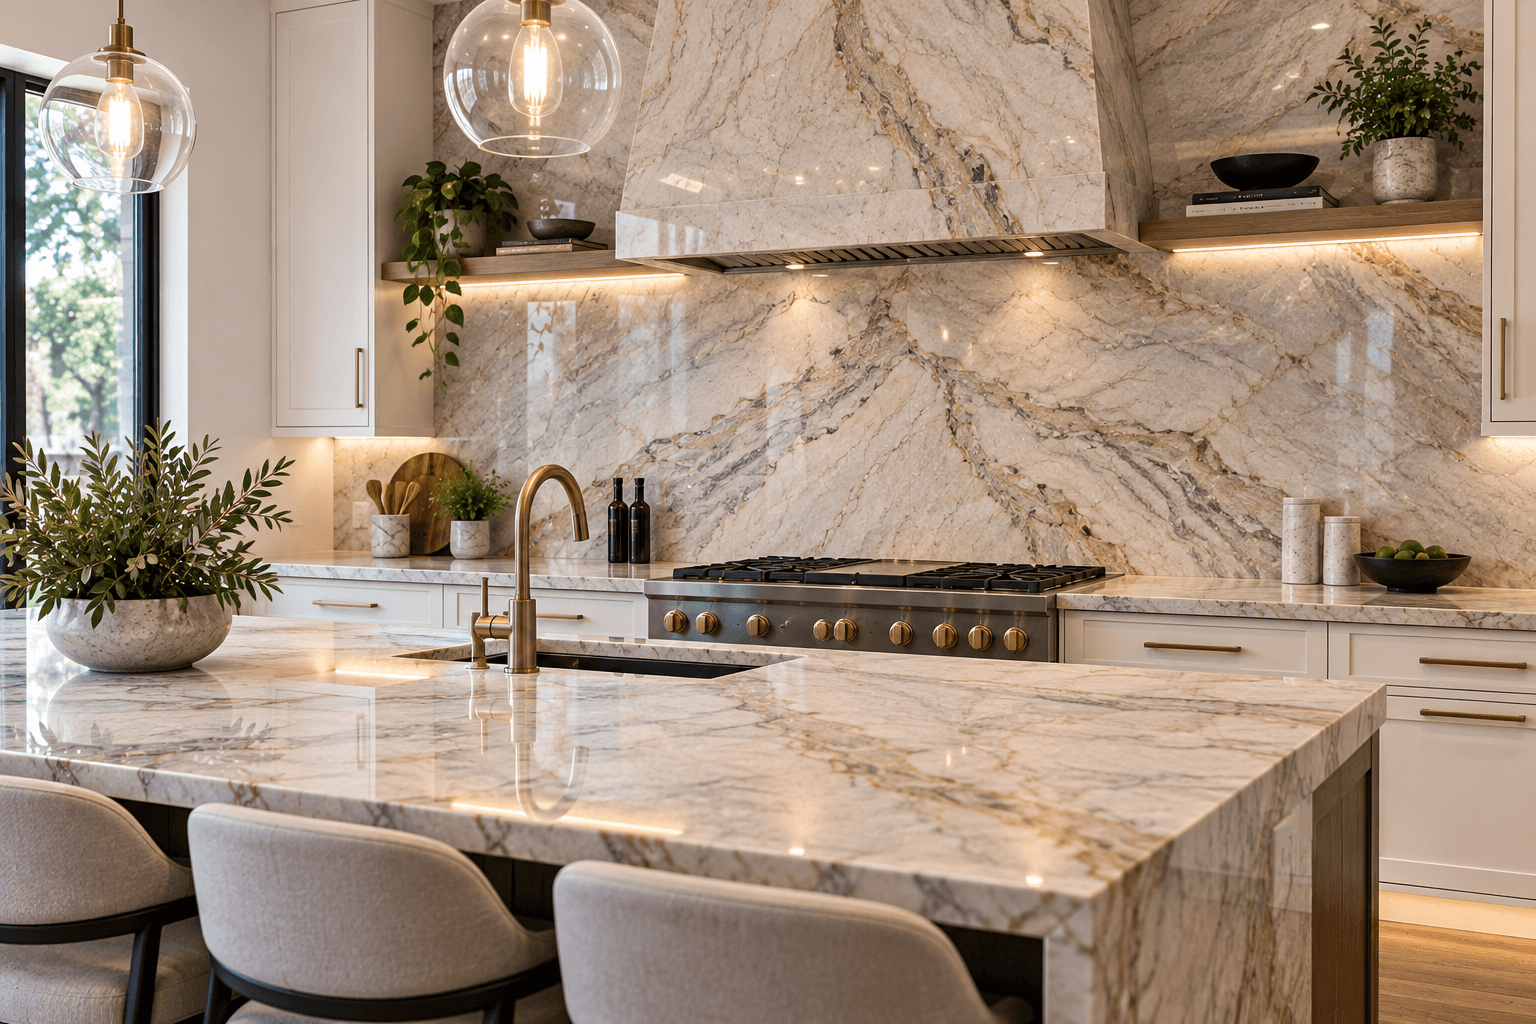
Full height stone backsplash planning should begin before the countertop slab is cut. Unlike a short backsplash strip or tile installed later, a slab backsplash can consume a significant portion of the same material being used for the countertops, require carefully positioned outlet and switch cutouts, interact with cabinets and range hoods, and depend on how the veining is laid out across both horizontal and vertical surfaces. When it is planned early, the backsplash can look like part of one continuous stone composition. When it is added late, it can create material shortages, awkward seams, mismatched movement, or unnecessary fabrication changes.
Quick answer: A full height stone backsplash extends slab material from the countertop up the wall instead of stopping at a short stone strip or switching to tile. Plan it before slab layout so enough material can be reserved, outlet and switch locations can be measured accurately, seams can be controlled, and the veining can be coordinated with the countertops whenever the slab allows.
Homeowners comparing stone surfaces for Chicago kitchen countertops should decide early whether the backsplash will use tile, a short stone strip, or full slab material because that choice can affect how much stone the project requires.
What Is a Full Height Stone Backsplash?
A traditional countertop installation may use a short stone backsplash several inches high.
Another common approach is tile installed between the countertop and upper cabinets.
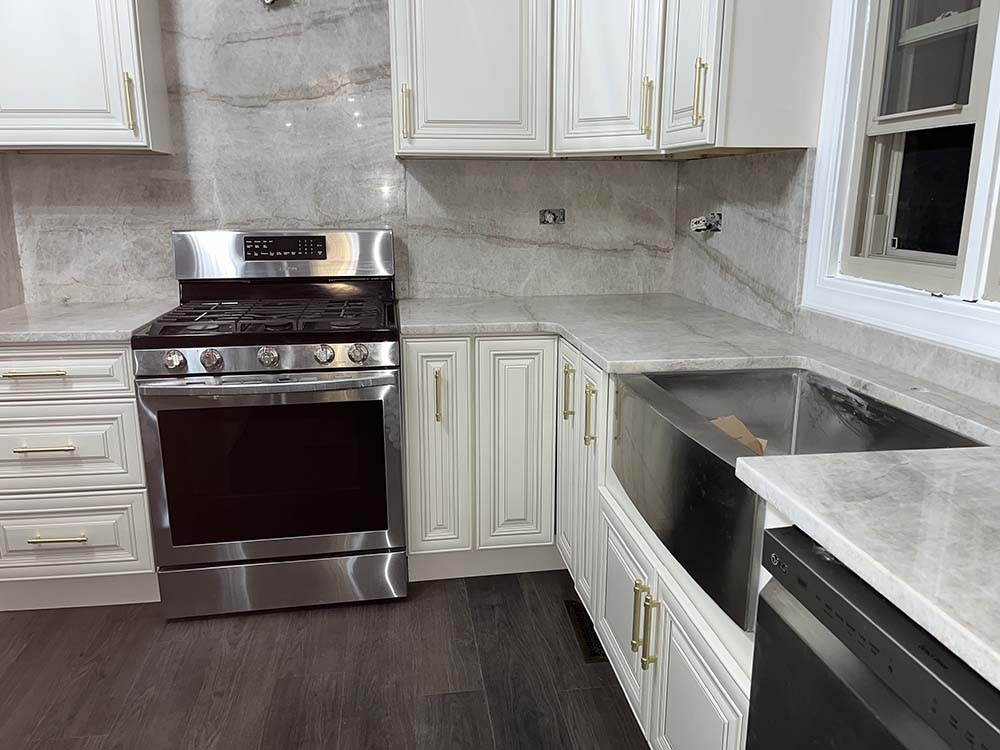
A full-height backsplash uses countertop slab material over a much larger portion of the wall.
It may run:
countertop to upper cabinets,
countertop to floating shelves,
countertop to the bottom of a range hood,
or even higher on an architectural feature wall.
That creates a different visual effect from tile.
Instead of introducing another material, grout lines and pattern, the countertop material continues vertically.
In a strongly veined marble, quartzite or marble-look quartz, that continuation can become one of the most visually important elements in the kitchen.
Why Full-Height Stone Looks So Different From Tile
Tile is made from many individual pieces.
Even large-format tile introduces joints and repetition.
Slab stone behaves differently.
A large section of material can show uninterrupted:
- veining;
- mineral movement;
- color transitions;
- dramatic pattern.
That means the backsplash can feel less like a wall covering and more like part of the architecture.
A strong vein may travel behind the range.
A subtle quartzite pattern may continue quietly under the cabinets.
A marble slab may become an entire focal wall.
The fewer visual interruptions there are, the more attention goes to the material itself.
That is one reason slab selection matters so much.
Start With the Slab, Not the Wall
The backsplash wall tells you the dimensions.
The slab tells you what is actually possible.
A large kitchen may require material for:
countertop perimeter,
island,
backsplash,
waterfall panels,
and other stone pieces.
All of those components compete for usable slab area.
If the backsplash is not included in the planning from the beginning, the fabricator may already have assigned the best areas of the slab to countertop pieces.
That is why a full height stone backsplash should be identified during estimating and slab layout rather than added casually after the countertops have already been cut.
Al Jory Marble’s countertop quote guide explains why full-height backsplash material should be included early when determining how many slabs a project may require.
Slab Layout Matters More on the Wall Than Most People Expect
Imagine a Calacatta-style slab with one strong diagonal vein.
There are several ways that vein could be used.
It could become the focal point across the island.
It could run along the perimeter countertop.
Or it could travel vertically behind the range.
Those decisions affect one another.
If the most dramatic portion of the slab is used entirely for the island, it may no longer be available for the backsplash.
If the backsplash is the priority, the slab layout may need to reserve that section first.
This is why good stone fabrication is not simply cutting rectangles.
The visual layout needs to be considered before the first major cuts are made.
Should the Veining Continue From the Countertop Up the Wall?
Sometimes.
And when the slab allows it, the effect can be excellent.
For example, a vein may begin across the countertop and appear to continue vertically into the backsplash.
This requires planning.
The fabricator has to consider how adjacent pieces are oriented on the slab and how much material exists between them.
Perfect continuity is not always possible.
Natural stone was not created specifically to fit your kitchen dimensions.
The slab has fixed size, fixed veining and fixed usable areas.
The goal should be thoughtful visual flow—not an unrealistic expectation that every vein can continue perfectly through every transition.
Al Jory’s slab selection, templating and cutting guide goes deeper into why slab layout and vein orientation should be decided before fabrication.
Bookmatching Can Create a Dramatic Feature
Bookmatching uses adjacent slab faces arranged so their patterns mirror each other.
When the right natural stone is available, this can produce a striking symmetrical effect.
A range wall is one location where bookmatching can become a major design element.
However, bookmatching depends on the stone and slab set.
Not every material is sold in bookmatched sequence.
Not every pattern produces an attractive mirrored effect.
And not every project has enough wall area to justify the additional layout complexity.
It should be considered as a design option—not treated as a requirement.
The Range Wall Usually Gets the Most Attention
In many kitchens, the most dramatic backsplash section sits behind the cooking area.
That space may include:
- range or cooktop;
- hood;
- upper cabinets;
- open shelves;
- pot filler;
- switches or outlets.
The wall can be visually simple or extremely busy depending on what is placed on it.
If the stone has strong movement, the cleanest design may be to let the slab do most of the visual work.
That could mean fewer decorative interruptions.
If the stone is quiet, cabinetry or a decorative hood may become the focal point instead.
The stone should support the architecture rather than compete with everything around it.
Coordinate the Stone With the Range Hood
Range hoods come in many forms.
Stainless steel.
Plaster.
Wood.
Cabinet-integrated.
Decorative metal.
A slab backsplash needs to terminate cleanly around whatever hood design is used.
Questions to resolve include:
Where does the stone stop?
Does it run behind the hood?
Does it terminate beneath the hood?
Does it extend to the ceiling around the hood?
Does cabinetry flank the stone?
These details change the size and shape of the backsplash pieces.
They should be known before fabrication.
Do Not Forget Appliance Requirements
Stone behind a cooking area must work with the specific appliance and installation.
Different ranges, cooktops and ventilation systems have different manufacturer instructions and clearance requirements.
Local requirements can also apply.
Do not choose the wall configuration solely from an inspiration photo.
The cooking appliance, ventilation system and stone layout should be reviewed together before installation.
The fabricator can plan the stone dimensions, but appliance and electrical requirements should be confirmed with the appropriate trades and manufacturer documentation.
Outlet Cutouts Are Part of the Fabrication
Tile installers can often work around electrical boxes piece by piece.
Slab material is different.
An outlet in the middle of a large stone panel requires a planned cutout.
That means outlet locations matter.
So do:
- switches;
- USB outlets;
- appliance outlets;
- controls.
The goal is not merely to make the opening large enough.
The opening should align correctly with the electrical box and leave a clean finished result when the wall plate is installed.
This is why moving outlets after stone fabrication can create unnecessary problems.
Think About Outlet Placement Before Final Templating
A full slab backsplash often makes homeowners notice outlet locations more than tile does.
Why?
Because every wall plate interrupts the stone pattern.
On a quiet white quartz surface, that may not matter much.
On highly veined marble or quartzite, an outlet placed directly through a dramatic vein can become visually noticeable.
That does not mean outlets should be moved irresponsibly just to protect a pattern.
Electrical placement still needs to meet applicable requirements.
But where options exist, the architectural plan can sometimes reduce visual interruptions.
Talk about it before the wall is templated.
Under-Cabinet Outlet Systems Can Change the Look
Some kitchen designs relocate certain outlets beneath upper cabinetry rather than placing them across the main backsplash field.
That can create a cleaner stone surface.
Whether that approach is appropriate depends on the electrical plan and applicable requirements.
The key lesson is not that every kitchen should hide outlets.
It is that electrical planning and slab planning should happen together.
Waiting until the stone is ready for installation is too late to rethink the whole wall.
Wall Flatness Matters
Countertop pieces sit on cabinets.
Backsplash pieces sit against walls.
Those walls may not be perfectly flat.
Older homes can have:
- bowed walls;
- uneven plaster;
- patches;
- irregular drywall;
- transitions between materials.
A large rigid slab does not bend itself around every irregularity.
If the wall is significantly uneven, preparation may be needed before installation.
That can mean correcting the wall surface before the stone goes up.
The objective is to provide a suitable plane for the slab rather than expecting adhesive to compensate for major irregularities.
Old Chicago Homes Need Extra Attention
Older Chicago housing creates its own conditions.
Bungalows, two-flats, greystones and older detached homes may contain wall surfaces that have been altered multiple times.
Behind the existing backsplash there could be:
old tile adhesive,
plaster,
patches,
multiple drywall layers,
or prior repairs.
That does not mean a slab backsplash cannot be installed.
It means the wall condition needs to be evaluated after the existing material is removed.
A beautiful new slab should not be installed over a wall that was never prepared for it.
Cabinets Should Be Final Before Backsplash Measurement
Upper cabinet placement establishes several backsplash boundaries.
If cabinets are still moving, the stone dimensions are not final.
The same applies to:
- range hood;
- floating shelves;
- windows;
- appliance panels.
Stone fabrication needs finished or properly established reference points.
Measure too early and later changes can create gaps or pieces that no longer fit.
Windows Add Another Layer of Fabrication
Some kitchens have countertop stone running up around a window.
This can look excellent.
But it creates more pieces and more transitions.
The stone may need to fit around:
- window casing;
- sill;
- jamb;
- outlets;
- corners.
Some designs replace a traditional window sill with stone.
Others bring the backsplash directly to the existing trim.
The correct choice depends on the architecture and the intended finished look.
It should be included during templating rather than improvised during installation.
Open Shelves Need to Be Planned Early
Floating shelves over stone can create a very clean kitchen.
But the shelf attachment has to be considered.
If the wall requires blocking or mounting hardware, those details should be established before the backsplash panel is installed.
Drilling through finished slab later may be possible in certain situations, but it is better to coordinate mounting points early whenever possible.
Again, the lesson is sequencing.
Stone works best when the other components have already been planned.
Full Height Stone Backsplash and Material Choice
Different materials create very different visual effects.
Quartz
Quartz can provide:
consistent background color,
controlled veining,
low routine maintenance,
broad pattern selection.
For large backsplash areas, pattern repeat and slab-to-slab consistency deserve attention.
Granite
Granite can produce extremely distinctive walls because the material contains natural mineral movement.
Some slabs are quiet.
Others are highly dramatic.
A full wall makes that movement much more visible.
Quartzite
Quartzite is especially effective when the slab itself is a major design feature.
Large natural veins and tonal movement can become almost artwork-like on a vertical surface.
Marble
Marble offers natural depth and veining that can look particularly striking behind a range or across an entire feature wall.
Material care and the characteristics of the actual marble still matter.
Choose the material based on the real kitchen—not only the backsplash photograph.
You Do Not Have to Match the Countertop Exactly
A slab backsplash can match the countertop.
But it does not have to.
Some kitchens use:
one stone on the island,
another on the perimeter,
and a coordinated slab on the wall.
Others use the same material everywhere for maximum continuity.
The best approach depends on the overall design.
If the kitchen already has dramatic cabinetry, flooring and lighting, one continuous stone may calm the room.
If the cabinetry is simple, a more expressive backsplash can become the focal point.
Matching Countertop and Backsplash Creates Continuity
Using the same material can make the kitchen feel more unified.
This is particularly effective when:
- cabinets are visually simple;
- stone has beautiful movement;
- there are few wall interruptions;
- the kitchen is open to other living spaces.
The counter and wall begin to read almost as one continuous surface.
This approach often works especially well with Calacatta-inspired quartz, marble and quartzite.
Contrasting the Backsplash Can Add Depth
A different stone can also work.
For example:
quiet perimeter countertop
- dramatic wall slab.
Or:
warm quartzite countertop
- more restrained backsplash.
The key is deliberate contrast.
If the surfaces are almost the same but not quite, the result may look accidental.
If they are intentionally different, the contrast can feel designed.
Seams Need to Be Planned on the Wall Too
A backsplash panel cannot always be fabricated as one piece.
Wall width, slab size, material layout, openings and installation access may require multiple sections.
When seams are necessary, their location matters.
Possible locations may be influenced by:
- cabinets;
- hood;
- window;
- slab pattern;
- panel size;
- installation access.
A seam placed thoughtfully can disappear into the overall composition much more effectively than one placed only for cutting convenience.
Al Jory Marble’s guide to countertop seam placement explains the broader thinking behind seam location and pattern flow.
Corners Require Decisions Too
L-shaped kitchens can create inside corners where two stone walls meet.
The veining may approach that corner from different directions.
Depending on the slab and layout, the fabricator may try to create visual continuity.
But natural stone cannot always turn a corner like wallpaper.
Sometimes the most attractive solution is to accept a clean transition instead of forcing imperfect vein matching.
The goal is a convincing finished composition.
Not artificial perfection.
Thickness Changes the Appearance
Backsplash slabs do not always need to appear as visually heavy as countertop edges.
Depending on material, design and fabrication strategy, the wall application may be detailed differently from the horizontal surface.
The finished thickness should work with:
- outlet boxes;
- window trim;
- hood;
- cabinet depth;
- shelf brackets.
This is another reason the backsplash should be included during design rather than treated like an accessory.
Full-Height Stone Behind Floating Shelves
Floating shelves over stone can create a striking combination.
The shelf introduces warmth or contrast.
The slab provides uninterrupted pattern.
But consider how much of the stone will actually remain visible.
If multiple shelves, rails, accessories and outlets cover the wall, you may be paying for a dramatic slab only to hide much of it.
Sometimes a quieter layout works better.
Use the stone where it can actually be seen.
What Happens Around a Pot Filler?
A pot filler adds another penetration through the backsplash.
Its plumbing location needs to be known.
The stone panel needs the correct opening.
And the final fixture needs enough room to operate without colliding with:
- hood;
- shelves;
- cabinets.
A pot filler should therefore be part of the wall plan before stone cutting.
Late changes can affect both plumbing and fabrication.
Where Should the Backsplash Stop?
There is no universal answer.
Common stopping points include:
bottom of upper cabinets,
bottom or sides of hood,
floating shelf,
ceiling,
window edge,
end of countertop run.
The cleanest stopping point usually follows an architectural line that already exists.
Avoid arbitrary endings in the middle of an open wall when a more natural transition is available.
Stone to the Ceiling Can Be Dramatic
Extending slab material higher than the upper cabinets or hood can create a strong feature wall.
It works especially well when:
- ceiling height is moderate;
- wall width is controlled;
- stone has interesting movement;
- the room has relatively simple surrounding finishes.
But it also uses significantly more material.
Before choosing this approach, make sure the visual impact justifies the additional slab area and fabrication.
Full Height Stone Backsplash Cost Depends on More Than Square Footage
Homeowners sometimes expect the wall material to price exactly like another countertop area.
But fabrication may include different work.
Cost can be affected by:
- material quantity;
- number of slabs;
- outlet cutouts;
- switch cutouts;
- windows;
- hood shape;
- seams;
- vein matching;
- installation access;
- wall height;
- wall preparation.
A simple rectangular panel between countertop and upper cabinets is different from an entire range wall with outlets, hood transitions and bookmatched natural stone.
Compare the complete fabrication scope.
Not only raw square footage.
Include It in the Estimate From the Beginning
This is important.
If the estimate initially includes only countertops and the backsplash is added later, the project may need:
another slab,
revised slab layout,
additional fabrication,
new measurements.
That does not mean it cannot be added.
It simply may no longer fit within the original material plan.
Mention the backsplash while requesting the countertop estimate.
The earlier everyone knows, the more efficiently the slabs can be allocated.
Fabrication Begins With the Real Wall
Slab backsplash pieces need accurate dimensions.
The wall may include:
- uneven corners;
- outlet boxes;
- window trim;
- hood cutouts;
- shelf locations.
Templates and measurements should reflect the space as it will actually be installed.
Al Jory Marble’s custom countertop fabrication services cover digital templating, CNC cutting, edge finishing, cutouts and slab layout from its Crestwood fabrication shop.
The Shop Layout Is Where the Visual Decisions Become Real
Once the measurements exist, the fabricator has to determine exactly where the backsplash pieces come from on the slab.
That decision may involve balancing:
countertop pieces,
island,
backsplash,
seams,
pattern direction,
usable slab area.
With quiet quartz, the process can be relatively straightforward.
With heavily veined natural stone, moving a piece several inches on the slab may completely change the final wall.
Al Jory’s inside-the-countertop-shop guide shows why slab layout happens before cutting rather than treating the slab simply as raw square footage.
Installation Access Matters
Large backsplash panels are rigid and heavy.
They need to reach the kitchen safely.
That means installers may need to consider:
- doors;
- hallways;
- stairways;
- cabinets;
- ceiling height;
- panel dimensions.
A huge single panel may look ideal on a drawing but be impossible to maneuver into a particular room.
That can affect where seams are placed.
This is especially important in Chicago condos, walk-ups and older homes with narrow access.
The best panel layout is one that is both visually strong and physically installable.
Countertops Usually Come First
In many stone installations, horizontal countertops establish the base line.
The backsplash can then be fitted to the finished counter surface.
This helps create a clean relationship between the two materials.
Exact sequencing can vary by project, but the important principle is that the backsplash should be fabricated around the real countertop and wall conditions—not around assumptions that may change later.
Should You Use Full-Height Stone Everywhere?
Not necessarily.
One feature wall may be enough.
For example:
slab behind the range,
tile elsewhere.
Or:
full-height stone on the main perimeter,
paint or tile on another section.
Using stone selectively can give the most important part of the kitchen greater visual impact.
More material is not automatically better design.
When Tile May Be the Better Choice
Slab stone is not the right answer for every kitchen.
Tile may make more sense when:
- budget needs to be lower;
- homeowner wants color or pattern;
- wall geometry is extremely complex;
- material changes are part of the design;
- handmade texture is preferred.
A slab backsplash is a particular aesthetic and fabrication choice.
It should be selected because it supports the kitchen—not simply because it is considered premium.
When a Full Height Stone Backsplash Makes the Most Sense
It is especially effective when the project already has:
a beautiful slab worth displaying,
simple cabinetry,
strong countertop-to-wall continuity,
carefully planned electrical locations,
a focal range wall,
or an open kitchen where the wall is visible from adjoining rooms.
It is less successful when it is treated as a late upgrade after every other wall decision has already been made.
What to Finalize Before Fabrication
Before the slab is cut, the important backsplash decisions should be resolved: final wall dimensions, countertop layout, upper cabinets, hood, outlets and switches, window details, shelves, stone selection, desired vein orientation, backsplash height, and any known seams.
That information allows the fabricator to design the pieces rather than react to surprises later.
FAQs About Full Height Stone Backsplashes
What is a full height stone backsplash?
It is a backsplash made from slab material that extends substantially higher than a traditional short countertop backsplash, often from the countertop to upper cabinets, a hood, shelves or another architectural stopping point.
Does the backsplash have to match the countertop?
No. It can use the same slab material for continuity or a coordinating material for contrast. The decision should work with the cabinets, island, flooring and overall kitchen design.
Can the countertop vein continue into the backsplash?
Sometimes. Vein continuity depends on slab size, slab pattern, the layout of the countertop pieces and how much material is available. It should be planned before cutting.
Does a slab backsplash have seams?
It may. Wall dimensions, slab size, access, pattern and openings can require multiple pieces. Seam placement should be considered during slab layout.
Are outlet holes cut into the stone?
Yes. Outlet and switch openings need to be incorporated into the fabricated backsplash pieces so they align with the electrical boxes.
Can stone go behind a range?
Stone is commonly used behind cooking areas, but the specific material, appliance installation, ventilation and applicable clearance requirements should be reviewed as part of the project.
Can full slab stone go around a kitchen window?
Yes. Stone can be fabricated around windows and may also be used for sills or returns depending on the design. Accurate measurement becomes especially important.
Should I decide on a slab backsplash before buying stone?
Yes. It can substantially change the amount of material required and may affect which portions of the slab are reserved for the countertop, island and wall.
Make the Wall Part of the Slab Plan
A full height stone backsplash works best when it is treated as part of the countertop project from the very beginning.
Reserve the material.
Plan the veining.
Confirm the outlets.
Establish the hood.
Measure the finished wall.
Think about seams.
And decide where the stone will stop.
Those decisions determine whether the finished backsplash looks like a natural extension of the countertop or an expensive piece of stone added after everything else was already designed.
When the slab itself is beautiful, the wall can become one of the most memorable parts of the kitchen.
Al Jory Marble fabricates and installs marble, quartz, granite and quartzite surfaces for kitchens throughout Chicago and the surrounding suburbs, including countertops, islands and slab backsplash work produced from its Crestwood fabrication shop. The live kitchen pages specifically show full-height backsplashes as part of the company’s fabrication capabilities.
Al Jory Marble
Phone: (708) 362-7674
Address: 4711 135th St, Crestwood, IL 60418
Email: aljorymarble9446@gmail.com
Hours: Mon – Sat: 9:00 am – 6:00 pm




Serving Chicago & Surrounding Areas
Get Your Free Kitchen Countertop Estimate
Fill out the form and our team will get back to you in next 24 hours.