
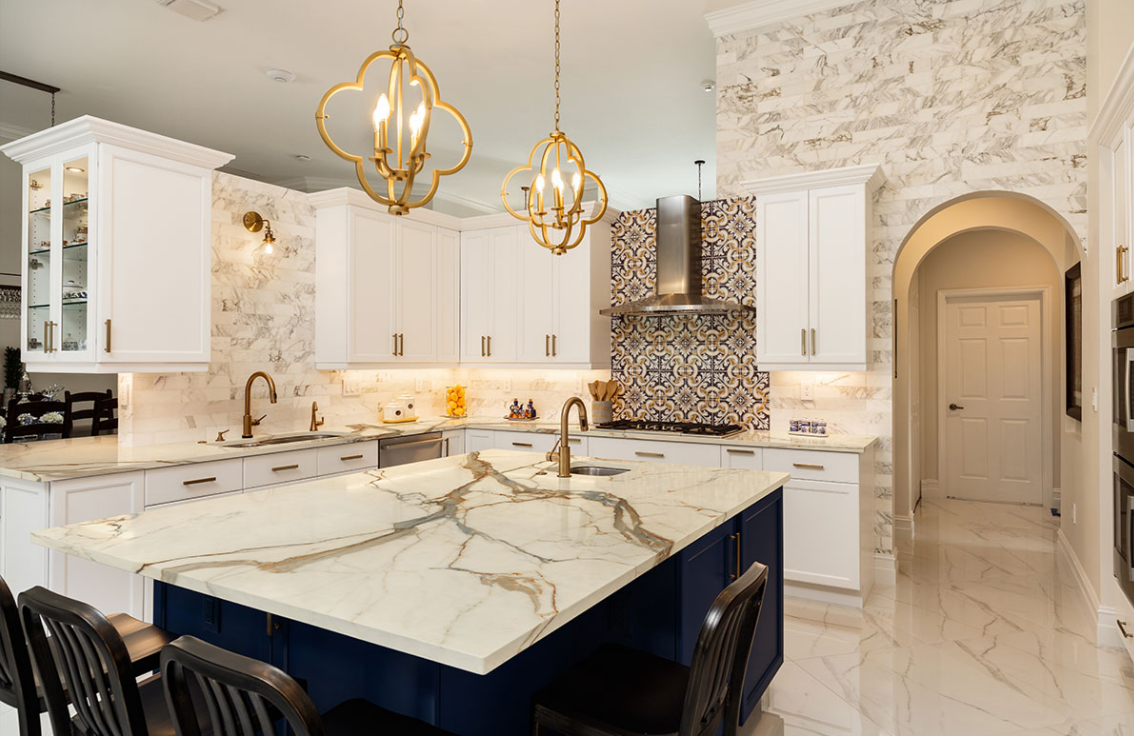
Most countertop advice stops at picking a material. That is the easy part. What actually determines whether your kitchen looks custom or looks compromised is everything that happens after: which slab gets pulled, where the seams land, how the edge is profiled, whether the sink reveal is even, and whether the crew that sets the stone is the same crew that cut it.
This guide walks the entire process from first measurement to final walkthrough, in the order it happens. It is written for homeowners who want to understand what they are buying, and for anyone comparing quotes who has noticed that two fabricators can price the same kitchen very differently.
Written by the fabrication team at Al Jory Marble, Jory Marble Granite Quartz INC, a Crestwood countertop fabricator with our own slab yard, our own shop, and our own installation crew. Ten years fabricating countertops across Chicagoland. Questions on your own kitchen: (708) 362-7674.
Why Fabrication Quality Matters More Than Material Choice
Two kitchens can use the exact same quartz from the exact same manufacturer and look nothing alike.
In one, the seam runs across the middle of the main prep run where you see it every day, the pattern jumps at the joint, the sink reveal is wider on the left than the right, and the edge polish goes slightly dull where the fabricator rushed. In the other, the seam is tucked at the back of a corner, the veining runs continuously across it, the reveal is even all the way around, and the edge has the same depth of polish as the face of the slab.
Same material. Same price bracket. Completely different result. The difference is fabrication.
This is worth understanding before you shop, because it changes what you should be asking about. The material question, which stone, is largely a matter of taste and maintenance tolerance, and we cover it separately in our material guides. The fabrication question, who is cutting it and how, is where the money you spend either shows up in the finished kitchen or does not.
One practical consequence. When a quote comes in noticeably below the others, the material is rarely where the savings came from. Slab cost is close to fixed across the market. The savings almost always come out of labor: less careful slab layout, seams placed for cutting convenience rather than appearance, a faster edge polish, or the whole job handed to a subcontractor the company you hired has no control over.
Step One: Measurement and the Free Estimate
How countertops are priced
Countertops are sold by the square foot of finished surface, calculated from your actual layout, plus separate line items for the things that take extra labor.
To get a rough figure yourself before anyone visits, measure the length of every counter run in inches, multiply each by its depth, add them together, and divide by 144. Standard base cabinet runs are 25 to 25.5 inches deep once the countertop overhang is included. An island is measured at its finished dimensions including any seating overhang.
A typical mid-size kitchen lands somewhere around 40 to 60 square feet of finished surface. That number is what a fabricator quotes against, but it is not the amount of stone your job consumes, which brings us to the part most homeowners find surprising.
Why your job uses more slab than your countertop measures
Slabs are rectangles. Kitchens are not. Every cutout, every corner, every run that has to be nested around an existing shape produces offcut that cannot be used elsewhere on your job.
As a rough rule, a job typically consumes noticeably more slab than the finished square footage, and on kitchens with a lot of cutouts, small runs, or a stone with directional veining that has to be laid out a specific way, the gap widens further. This is normal, it is not padding, and it is why two fabricators quoting the same kitchen can arrive at different slab counts.
It is also why the answer to “can I just buy one slab” is sometimes no, and why an honest fabricator will show you the layout rather than just quoting a number.
What should be in a written estimate
A quote worth comparing itemizes rather than presenting a single figure. Look for:
- Material, by name, with the specific slab or lot identified where possible
- Square footage calculated from your layout, and the number of slabs required
- Edge profile, named, and whether it is included or an upgrade
- Sink cutout and the number of faucet or accessory holes
- Cooktop cutout if applicable
- Seam count and, ideally, seam locations
- Overhang support, if any is required
- Removal and disposal of the existing countertop
- Delivery and installation
- Who disconnects and reconnects the plumbing
- Sealing, if the material requires it
- Backsplash, if included, and in what form
A number with no breakdown is not a quote. It is an opening position, and it is impossible to compare against anything.
Step Two: Choosing the Slab
Why a sample cannot tell you what you are buying
A two inch sample chip is a color reference and nothing more. Natural stone moves. Veining shifts direction, thickens, thins, and changes character across the length of a slab. Background tone can be noticeably lighter at one end than the other. A dramatic vein that looks striking in a photograph may run diagonally in a way that fights your island shape.
Engineered quartz is more consistent by design, but even quartz varies by production lot, and the large-format veined patterns that imitate marble have a repeat that has to be planned around so the same feature does not appear three times in the same sightline.
This is the argument for walking a slab yard rather than ordering from a display board. You are not choosing a color. You are choosing a specific piece of stone.
What to bring when you come to look
- A door front from your cabinets, or the actual paint sample if the cabinets are being painted
- A flooring sample, or a photograph in natural light if it is already installed
- Your backsplash tile sample if it is already chosen
- A rough sketch of the layout with the island dimensions
- Photographs of the room, including one showing how daylight enters
Hold the cabinet door directly against the slab. Undertones that are invisible in isolation become obvious side by side, and a warm white cabinet against a cool white quartz is the single most common regret we see.
How to read a slab
- Movement and direction. Decide which way the veining will run before you commit. On a long island, veining that runs the length of the piece reads intentional. Veining running across it usually does not.
- Book-matching. Consecutive slabs cut from the same block open like a book and mirror each other. Used on a waterfall island or a full-height backsplash, this is one of the most striking things you can do with natural stone. It requires buying the matched pair together.
- Vein continuation. Even without book-matching, sequential slabs from the same block let a fabricator carry a vein across a seam so the pattern continues rather than jumps.
- Fissures are not cracks. A fissure is a natural feature in stone, a separation along a crystalline boundary, and it is structurally normal. A crack is damage. Ask which you are looking at, and ask to see the back of the slab.
- Resin treatment. Many natural slabs are resin-treated at the quarry to fill microporosity and stabilize the surface. This is standard practice, not a defect.
- Pitting. Small surface pits are natural in some granites and quartzites. They are a characteristic of the stone, not poor finishing.
Remnants
If your job is small, a bathroom vanity, a small island, a bar top, ask about remnants. These are usable offcuts from previous jobs, and they are typically priced well below a full slab. The catch is availability: you get what is in the rack, and you cannot order a specific one. For a vanity top it is often the best value in the shop.
Reserve the slab
Once you choose, the slab should be tagged and held for your job. Get this in writing, along with the slab identification. Slab yards move a great deal of stone, and “we will pull one just like it” is not the same thing as the piece you stood in front of.
Step Three: Templating
Why templating happens after cabinets are installed
This is the single most common scheduling surprise for homeowners. Countertops cannot be fabricated from a drawing. They are fabricated from a template taken off the cabinets as they actually sit in your kitchen, because no room is perfectly square and no cabinet run is perfectly straight.
The practical consequence is a gap in the middle of a kitchen project. Cabinets go in, template happens, then fabrication takes time in the shop, then installation. Expect to live with cabinets and no countertops for a period. This is normal and it is not the fabricator stalling.
What has to be ready on template day
Templating a kitchen that is not ready wastes the visit and pushes your install date. Before the templater arrives:
- All base cabinets are installed, permanently fastened, and level
- Any appliance that sits under the counter is on site, or its exact model and specification sheet is available
- The sink is on site, physically, not just ordered. Templates are cut to the actual sink
- The faucet and any accessories, soap dispenser, air gap, filtered water tap, are selected so hole placement can be marked
- The cooktop is on site or its cutout specification is available
- Decisions on edge profile, overhang dimensions, and backsplash treatment are made
- The work area is clear enough to move a template through
How templating works
Most shops now use digital laser templating, which captures the room as a set of coordinate points and produces a digital file that drives the cutting equipment directly. It records what a tape measure cannot: walls that are out of square, walls that bow, cabinet runs that drift, and the exact relationship between every fixed object in the room.
Physical templating, building a pattern in thin strips of material, is still used in some situations and is perfectly accurate in skilled hands. Either way, the output is the same: a precise record of the actual space rather than the intended one.
Decisions that lock at template
Once the template is taken and the slab goes to the saw, changes get expensive. Confirm all of the following before the templater leaves:
- Edge profile
- Overhang depth on every run, including seating overhangs
- Sink model and mounting style, and the reveal type
- Faucet hole count, positions, and spacing
- Cooktop model and cutout
- Seam locations, agreed and marked
- Backsplash: none, a short return, standard height, or full slab
- Whether the counter runs behind the range or butts to it
- How the counter terminates at the end of a run: finished edge, against a wall, or a return
Step Four: Layout and Seams
Why seams exist
Slabs have a maximum size. Natural stone slabs commonly run somewhere in the range of eight to ten feet long, and engineered quartz jumbo slabs run longer, but sizes vary by supplier and material. Any counter run longer than the usable slab length needs a seam.
Seams also become necessary when a piece is too large to physically carry into your house, around a corner, or up a stairwell, and when an L or U shaped run cannot be nested on the slab without enormous waste.
Seams are not a defect and a fabricator promising a seamless kitchen on a large layout is either quoting a material that does not need them, or is not telling you where they are going.
Where seams should go
Placement is a design decision, and it is one you should participate in.
Good seam locations:
- Behind or beside a sink cutout, where the cutout already interrupts the surface
- At an inside corner, where the eye reads a change of direction anyway
- At a cooktop cutout, for the same reason
- On a short run rather than across the primary prep zone
- Where cabinetry below provides continuous support at the joint
Locations to avoid:
- Across the middle of the main working run, in your daily sightline
- Through the middle of an island top with nothing to break it up
- Anywhere the veining would visibly jump
- Unsupported spans
One rule worth insisting on: the seam should be discussed and agreed before fabrication, not discovered on install day. A fabricator who will not tell you where the seams are going before cutting is telling you something.
What makes a good seam
- Color-matched adhesive. A two-part polyester or epoxy tinted to the stone, mixed on site to the actual piece, not squeezed from a generic tube.
- A tight joint. The two edges are cut to meet cleanly. A good seam is felt with a fingernail, not seen from across the room.
- Level across the joint. Seam setters, vacuum clamps that pull both sides into plane, are how this is achieved. Without them you get a lip.
- Rodding where needed. A steel or fiberglass rod set into a kerf on the underside, typically behind a sink cutout or across a narrow span, reinforces the weakest part of the top. This is invisible when finished and it is the difference between a top that lasts and one that cracks at the sink.
- Pattern continuation. On veined material, a fabricator laying out carefully can carry a vein across the seam. This takes more slab and more planning, and it is the clearest visible marker of careful work.
A seam will always be findable if you go looking. The standard to hold is that it should not be the first thing you notice when you walk into the room.
Step Five: Edge Profiles
The edge is the part of the countertop you touch every day and the part visible in every photograph. It is also one of the cheapest places to change the character of the finished job.
| Profile | Description | Reads as |
|---|---|---|
| Eased | A very slight break on the top and bottom arris, essentially a square edge with the sharpness removed | Modern, minimal, the most common contemporary choice |
| Straight or square | A true square edge, crisply finished | Modern and architectural. Shows chips more readily than eased |
| Quarter round | Top arris rounded, bottom eased | Soft, transitional, forgiving |
| Half bullnose | Top half rounded over, flat bottom | Softer, traditional, sheds water well |
| Full bullnose | The entire edge rounded into a half circle | Traditional. Makes the top read thinner than it is |
| Bevel | A flat chamfer, commonly at 45 degrees | Transitional. Catches light along the run |
| Ogee | An S curve | Formal and traditional. The most decorative common profile |
| Dupont | A step then a curve | Ornate traditional |
| Mitered or laminated | Two pieces joined at 45 degrees to create a thicker apparent edge | Modern. Produces a chunky 4cm, 6cm, or thicker look from standard material |
| Waterfall | The material continues vertically down the side of an island to the floor | The dramatic modern statement. See below |
Thickness
- 3cm is the standard for kitchen countertops in this market. It is strong enough to span cabinets without a plywood substrate and it reads substantial.
- 2cm costs less in material but usually needs a substrate and is frequently built up at the edge with a laminated strip so it looks like 3cm. Once you add the labor, the savings often shrink.
- Mitered edges let you go the other direction. A 3cm slab mitered at the edge can present as 6cm or more, a very current look, at the cost of additional fabrication.
Waterfall panels
A waterfall island continues the countertop material down the end of the island to the floor. Done properly, the miter at the corner is tight, the polish continues around it without a visible change, and on veined stone the veining runs continuously from the horizontal surface down the vertical face.
It is one of the highest-skill operations in countertop fabrication. It consumes significantly more material, and vein continuation around the corner requires the panel to be cut from the adjacent section of the same slab. Ask to see photographs of waterfall corners the shop has actually produced, not stock images.
Step Six: Cutouts
Sink cutouts and reveal
How the sink meets the stone is one of the most visible details in the finished kitchen, and it is a choice, not an accident.
| Reveal | What it looks like | Notes |
|---|---|---|
| Positive reveal | The cutout is slightly larger than the sink bowl, so a thin band of the sink rim is visible all the way around | Most forgiving to fabricate. Common and perfectly acceptable |
| Negative reveal | The stone overhangs the sink rim slightly | Cleanest to wipe into, but the overhanging stone edge is exposed to knocks |
| Zero reveal or flush | The cutout follows the bowl exactly | The most refined look and the least forgiving. Any deviation shows immediately |
Whichever you choose, the standard to hold is consistency. An uneven reveal, wider on one side than the other, is the most common visible fabrication error in a kitchen.
Mounting types:
- Undermount is the default with stone. The sink is fastened below the surface, so you wipe crumbs straight into the bowl. It requires a polished cutout edge, because that edge is visible.
- Drop-in sits on top of the stone with a visible rim. Cheaper, and the rim collects grime.
- Farmhouse or apron front requires a purpose-built cabinet and a specific cutout treatment. The sink must be on site and set before templating, since the stone is cut to sit around it.
- Integrated sinks, carved from the same material, are available in some engineered materials and solid surface. Seamless, expensive, and not possible in most natural stone.
Faucet and accessory holes
Every hole is drilled at fabrication, not on site, and every hole has to be decided at template. Count them:
- Faucet, one hole or three depending on the model
- Side spray, if separate
- Soap or lotion dispenser
- Air gap, if your local code or dishwasher installation calls for one
- Filtered water tap
- Instant hot water tap
Adding a hole after the top is installed is possible but risky, and it is a job nobody enjoys. Decide now.
Cooktop cutouts
The cutout comes from the appliance manufacturer’s specification sheet, not from measuring the appliance. Provide the model number. Cooktop cutouts also carry clearance requirements to combustible material and to surrounding surfaces that vary by appliance, so the specification sheet is the governing document.
Why cutout corners are radiused
Inside corners on any cutout are cut with a radius rather than a sharp square. A sharp inside corner concentrates stress at a single point, and that is where a top cracks, often months later from ordinary use rather than at install.
If a fabricator offers you square inside corners on a sink or cooktop cutout, understand what you are accepting. A tight radius is the correct compromise between appearance and durability.
Islands and outlets
If your island needs power, that decision belongs to the electrician and it happens before the top goes on. Receptacle requirements for islands have changed across recent code cycles and are adopted differently by different Illinois municipalities, so your electrician confirms what applies at your address. From the fabrication side, what matters is knowing early whether the top needs a cutout, a pop-up unit, or nothing at all.
Step Seven: Overhangs and Support
Standard overhang
The countertop projects past the cabinet face, typically about 1 to 1.5 inches. This is standard, it sheds spills away from the cabinet doors, and it needs no additional support.
Seating overhangs
An island or peninsula with stools needs a deeper overhang for knees:
| Counter height | Recommended knee overhang |
|---|---|
| 36 inch standard counter | 15 inches |
| 42 inch raised bar | 12 inches |
| 30 inch table height | 18 inches |
When support becomes necessary
Stone is strong in compression and weak in tension. An unsupported overhang is a lever, and the failure mode is not gradual. Somebody sits on the edge of the island, or a child hangs off it, and the top snaps.
As a general threshold, unsupported overhangs beyond roughly 10 to 12 inches in 3cm material should be supported, and the exact figure depends on the material and, for engineered stone, on the manufacturer’s published specification. Your fabricator should state the threshold they work to.
Support options:
- Corbels. Visible brackets under the overhang, wood or metal. Traditional appearance, and they intrude on knee space, so their placement matters.
- Steel plates or flat bar. Set into the cabinet top and hidden inside the assembly. Invisible in the finished kitchen and the preferred modern solution. Has to be planned before cabinets are closed up.
- Hidden L brackets. Concealed under the overhang against the cabinet side.
- Cabinet or panel returns. A knee wall or a waterfall panel carrying the load to the floor.
The important part is that support is decided at template, because steel usually has to go in before the top does.
Dishwasher support
A dishwasher has no cabinet top above it, so the countertop spans an open bay. Fabricators bridge this with a plywood strip, a steel bar, or a purpose-made bracket. It should be in the plan, not improvised on install day.
Step Eight: Fabrication in the Shop
This is the part homeowners never see, and it is where the money goes.
- Layout. The digital template is nested onto a photograph or scan of your actual slab, and this is where vein placement is decided: which part of the slab lands on the island, where the seam falls, how the pattern carries across it. Ask whether you can review and approve the layout. Good shops will show you.
- Cutting. A bridge saw or CNC cuts the perimeter and the cutouts. Waterjet is used for intricate work and for cutting harder materials cleanly.
- Edge profiling. The edge is shaped with profiling wheels, then run through progressively finer polishing steps.
- Polishing. This is where corners get cut in a cheap job. A properly polished edge has the same depth and clarity as the factory face of the slab. An under-polished edge looks slightly cloudy or dull next to the surface, and once you notice it you cannot stop noticing it. Run your eye along the edge in raking light before the crew leaves.
- Rodding and reinforcement. Rods are set behind cutouts and across narrow spans.
- Sealing. Natural stone is sealed in the shop or on site depending on the material and the shop’s process.
Ask directly whether the shop cuts your stone or sends it out. A company with its own saw, its own polishing line, and its own installers controls the whole outcome. A company that brokers the work controls none of it, and when something needs correcting, you are one step removed from the people who can correct it.
Surface finishes
- Polished. Reflective, deepens color, the most common. Shows fingerprints and water spots on dark stone.
- Honed. Matte, no reflection. Softer look, hides etching better on marble, but more prone to showing oil marks on some stones.
- Leathered or brushed. A textured finish with a slight sheen. Excellent at hiding fingerprints and smudges on dark granite, and it has become a common choice for islands.
Step Nine: Install Day
Before the crew arrives
- Clear the counters completely, and clear a path from the door to the kitchen
- Remove anything fragile from adjacent walls, since large pieces get maneuvered through tight spaces
- Confirm who is disconnecting the plumbing. In Illinois, plumbing work is performed by a licensed plumber, and whether that is arranged by the fabricator or by you should be settled in writing beforehand
- If the old top is being removed, confirm whether removal and disposal is included
- Expect some dust. Minor on-site cutting and grinding is normal even with precise templating
What happens
The old countertop comes off. Cabinets are checked for level and shimmed as needed, because stone follows whatever it is set on and a cabinet run that is out of level produces a top that is out of level. Your fabricator should state the tolerance they work to, commonly in the region of an eighth of an inch.
Pieces are dry-fit, adjusted, then set in adhesive. Seams are pulled together with seam setters and the joint is filled with color-matched adhesive and cleaned off. Cutouts are checked against the sink and cooktop. The perimeter is sealed with silicone where the stone meets the backsplash or wall.
Most kitchens are set in a single day.
After the crew leaves
- Silicone and seam adhesive need time to cure, commonly around 24 hours, before heavy use. Follow the specific product guidance your installer gives you
- Plumbing reconnection usually happens after the top is set and the adhesive has begun to cure, which may mean a day without a working sink
- If the material requires sealing, ask whether it has been done and when it should next be done
Step Ten: The Final Walkthrough
Do not sign off from the doorway. Walk the job with the crew still present and check these specifically:
- Seams. Run a fingernail across them. They should be level and tight. Look at them from a low angle in the best light in the room
- Edge polish. Sight along the entire edge in raking light. It should match the surface, with no dull sections or visible scratch lines
- Sink reveal. Check it is even all the way around
- Overhangs. Confirm they match what you agreed, and that any support is in place
- Level. Set a spirit level on each run and across each seam
- Backsplash and wall joint. Silicone should be a clean consistent line
- Cutouts. Confirm the cooktop and sink drop in properly before the crew leaves
- Chips. Inspect all edges, especially at corners and around cutouts
- Underside. Look underneath at the seams and the sink for rodding and clean adhesive work
- Cabinet doors and drawers. Open a few. Nothing should be binding against the new top
Anything you find is far easier to resolve while the installers are still in your kitchen.
Sealing, Cleaning, and Care
Which materials need sealing
| Material | Sealing |
|---|---|
| Quartz (engineered) | Never. It is non-porous by design |
| Granite | Periodically. Frequency depends on the specific stone, since granites vary widely in porosity |
| Marble | Regularly. Sealing slows staining but does not prevent etching |
| Quartzite | Periodically, and often more absorbent than people expect |
The water test
To find out whether your stone needs resealing, put a few drops of water on the surface in several places and leave them for 15 to 30 minutes. Wipe them off. If the stone has darkened where the water sat, it is absorbing and it is time to reseal. If it wipes away with no change, the seal is intact.
Do this every few months rather than working from a calendar.
Daily cleaning
- Warm water and a pH-neutral cleaner, or a cleaner made for natural stone
- Avoid vinegar, lemon, bleach, ammonia, and general-purpose bathroom or glass cleaners, all of which either etch stone or degrade sealers over time
- No abrasive pads or scouring powders
- Wipe spills promptly, particularly wine, coffee, oil, citrus, and tomato
- Use a cutting board. Stone will dull knives long before knives damage stone, but the finish still suffers
- Use trivets. Engineered quartz contains resin and can scorch or discolor under a hot pan, and even heat-tolerant natural stone can suffer thermal shock from a sudden extreme
Etching versus staining, and why the difference matters
They look similar and the fixes are completely different.
- A stain is something absorbed into the stone. It is darker than the surrounding surface. It is drawn out with a poultice, and it is preventable with sealing.
- An etch is a chemical burn. An acid has dissolved a microscopic layer of the surface, most commonly on marble and other calcite-based stones. It appears as a dull spot, lighter than its surroundings, and it is a change in the surface itself. Sealing does not prevent it. Minor etching on honed marble can often be buffed out with a polishing compound. Deeper etching needs professional refinishing.
If you are choosing marble and this concerns you, honed finishes hide etching considerably better than polished ones, because the surface is already matte.
Repairs
- Small chips, particularly at the sink edge or a corner, are usually repairable with a color-matched fill
- Dull spots on polished stone can often be re-polished on site
- A cracked top may be repairable depending on where the crack sits and whether it is through the full thickness. Cracks at cutout corners are the common case and are exactly why radiused corners and rodding matter
- Seam separation is unusual and usually indicates movement in the cabinets below rather than a failure of the seam itself
Replacing Countertops Without Replacing Cabinets
This is one of the most common projects we do, and it is entirely feasible, but there are things to know before you commit.
- The old top has to come off, and the backsplash usually suffers. If you have a tile backsplash, expect damage at the bottom course when the old top is removed. Plan to repair or replace the backsplash as part of the project rather than hoping.
- Cabinets must be sound and level. Stone is heavy. Cabinets that are failing, water damaged at the sink base, or badly out of level need attention first. New stone on bad cabinets is money in the wrong place.
- The sink is usually replaced at the same time. Removing an undermount sink from an old top rarely leaves it reusable, and the new cutout is made for the new sink.
- Wall condition gets exposed. Once the old backsplash and top come off, whatever is behind them is visible. Older Chicago homes frequently reveal plaster damage at this point.
- It is a fast project. Compared with a full kitchen remodel, a countertop replacement is a template visit, a fabrication window, and a single install day.
The result is that countertop replacement is one of the highest-impact changes available in a kitchen relative to the disruption, particularly where the cabinets are in good condition but the surfaces are dated.
How to Compare Countertop Quotes
Three quotes for the same kitchen will rarely be the same number. Here is how to tell what is actually different.
Confirm they are quoting the same thing
- Same material, same specific slab or product name, not a similar look
- Same thickness. A 2cm quote against a 3cm quote is not a comparison
- Same edge profile. Decorative profiles cost more than eased
- Same slab count
- Same inclusions: removal, disposal, delivery, installation, sealing, plumbing
Questions that separate fabricators
- Do you cut the stone in your own shop, or is fabrication subcontracted?
- Is the installation crew your employees?
- Can I see and approve the slab layout before you cut?
- Where will the seams be?
- Will you rod behind the sink cutout?
- What overhang do you support without brackets, and what does your support look like?
- Can I pick my exact slab and have it tagged?
- What is your policy if a piece is damaged in fabrication or transport?
- What happens if something is wrong on install day?
The middleman question
Many companies selling countertops do not fabricate them. They take your order, subcontract the templating, fabrication, and installation, and add margin. That model can work, but it means the company you hired cannot directly fix a bad seam, cannot show you the layout before cutting, and has no control over which crew shows up.
Asking who owns the saw is a fair question and the answer tells you a great deal.
Common Mistakes to Avoid
- Choosing from a sample chip instead of a slab. The most common and the most regretted
- Not agreeing seam locations before fabrication. By install day it is far too late
- Buying the sink after templating. The template is cut to the actual sink
- Forgetting a faucet accessory hole. Air gaps, filtered water taps, and soap dispensers are routinely remembered too late
- Assuming an overhang is supported. Ask, and get it in the quote
- Ignoring the edge polish at walkthrough. It is the easiest defect to spot on day one and the most annoying to live with
- Putting a bold veined stone against busy cabinetry and a busy backsplash. One element leads. The others support
- Choosing polished marble with no intention of maintaining it. Honed is more forgiving, and quartzite delivers a similar look with far more resistance
- Comparing quotes on the total only. The differences are always in the line items
Frequently Asked Questions
How long does countertop fabrication and installation take?
The visit and written estimate happen first, then templating, then fabrication in the shop, then installation. Templating takes an hour or two in a typical kitchen, and installation is usually completed in a single day. The fabrication window in between is the variable, and it depends on the material, the complexity of the layout, and whether the slab is in stock. Keeping a large slab inventory on site is what lets a shop start without waiting on a supplier order.
Why do countertops have to be templated after the cabinets are installed?
Because no room is perfectly square and no cabinet run is perfectly straight. A countertop is fabricated from a measurement of the cabinets as they actually sit in your kitchen, not from a drawing, which is why templating cannot happen earlier. This creates an unavoidable gap in a kitchen remodel where the cabinets are in and the countertops are not.
Where should countertop seams be placed?
Good seam locations are at or beside a sink cutout, at an inside corner, at a cooktop cutout, or on a short secondary run, and always where the cabinetry below provides continuous support. Avoid seams across the middle of the main prep run, through the center of an island, and anywhere the veining would visibly jump. Seam locations should be agreed with your fabricator before the slab is cut, not discovered on install day.
Can a countertop be installed with no seams at all?
Only if every run fits within a single slab and the pieces can physically be carried into the room. Slab sizes are limited, so most kitchens with long runs, L or U shaped layouts, or a large island will need at least one seam. A well-placed, color-matched seam with the veining carried across it should be something you can find if you look for it, not something you notice from the doorway.
How much overhang can a countertop have without support?
As a general threshold, unsupported overhangs beyond roughly 10 to 12 inches in 3cm material should be supported, though the exact figure varies by material and, for engineered stone, by the manufacturer’s published specification. Seating overhangs are typically 15 inches at a 36 inch counter, 12 inches at a 42 inch bar, and 18 inches at 30 inch table height, all of which need support. Hidden steel plates set into the cabinet are the cleanest solution and have to be planned before the cabinets are closed up.
What edge profile should I choose for my countertop?
Eased and square edges read modern and are the most common contemporary choices. Half bullnose and full bullnose are softer and more traditional. Bevel is transitional. Ogee and Dupont are the decorative traditional profiles. A mitered or laminated edge builds a thicker apparent slab from standard material and is a current modern look. The profile affects both appearance and cost, so it should be named specifically in your quote.
Should I choose 2cm or 3cm thickness?
3cm is the standard for kitchen countertops. It is strong enough to span cabinets without a plywood substrate and it reads substantial. 2cm costs less in material but usually requires a substrate and is often built up at the edge with a laminated strip to look like 3cm, and once that labor is added the savings frequently shrink.
Do quartz countertops need to be sealed?
No. Engineered quartz is non-porous by design and never needs sealing. Granite, marble, and quartzite are natural stone and do need periodic sealing. To check whether natural stone needs resealing, leave a few drops of water on the surface for 15 to 30 minutes and wipe them off. If the stone has darkened where the water sat, it is time to reseal.
What is the difference between a stain and an etch on a countertop?
A stain is something absorbed into the stone and appears darker than the surrounding surface. It can usually be drawn out with a poultice and is prevented by sealing. An etch is a chemical burn where an acid has dissolved a microscopic layer of the surface, most common on marble and other calcite-based stones, and it appears as a dull spot lighter than its surroundings. Sealing does not prevent etching. Minor etching on honed marble can often be buffed out, while deeper etching needs professional refinishing.
Why are the corners of sink and cooktop cutouts rounded?
A sharp inside corner concentrates stress at a single point, and that is where a countertop cracks, often months later from ordinary use rather than at installation. Cutting inside corners with a radius spreads that stress. A tight radius is the correct compromise between appearance and durability, and a fabricator offering square inside corners is offering you a future crack.
Can I replace my countertops without replacing my cabinets?
Yes, and it is one of the most common countertop projects. The cabinets need to be sound and reasonably level, since stone is heavy and follows whatever it is set on. Expect the backsplash to be damaged when the old top is removed, particularly a tile backsplash, so plan to repair or replace it. The sink is normally replaced at the same time because an undermount sink rarely survives removal from an old top intact.
What should be included in a countertop quote?
A quote worth comparing itemizes the material by name, the square footage from your layout, the number of slabs, the edge profile, the sink cutout and number of faucet holes, any cooktop cutout, the seam count, overhang support, removal and disposal of the old top, delivery and installation, who handles the plumbing disconnection and reconnection, and sealing if the material requires it. A single figure with no breakdown cannot be compared against anything.
How do I pick the right slab for my kitchen?
Go to the slab yard and look at full slabs rather than choosing from a sample chip, because veining, movement, and background tone shift across a piece of stone in ways a small sample cannot show. Bring a cabinet door, a flooring sample, and your backsplash tile, and hold them directly against the stone. Decide which direction the veining will run before you commit, and once you choose, have the slab tagged and reserved for your job in writing.
See Your Slab Before Anyone Cuts It
Al Jory Marble templates, fabricates, and installs with one team. Our saw, our polishing line, our crew. Nothing is handed to a middleman, which means the people who cut your stone are the people accountable for how it looks in your kitchen.
Walk the racks at our Crestwood showroom and slab yard at 4711 135th St, Crestwood IL 60418, Monday through Saturday, 9:00 am to 6:00 pm. Bring your cabinet door and your flooring sample and hold them against the stone.
Prefer to stay home? We bring samples to you and measure on the spot. The visit and the written estimate are both free.
Call (708) 362-7674 or request a free quote.





Serving Chicago & Surrounding Areas
Get Your Free Kitchen Countertop Estimate
Fill out the form and our team will get back to you in next 24 hours.